[스타일링]
방법
Framework
관련 내용
- BEM
- 읽기 전 참조 문서
Clean Code 는?
- Clean Code 는 단순히 작동하는 것 이상의 것을 말한다. Clean Code는 읽기 쉬워야 하고, 이해하기 쉬어야하고, 깔끔하게 정리되어야 합니다.
0. 시작 전
- lint(eslint,tslint…)와 formatter(prettier,beautify…) 를 사용하면 훨씬 쉽게 코드를 clean하게 작성할 수 있다.
- class 및 함수 작성시 자바스크립트 클린코드를 참조 한다.
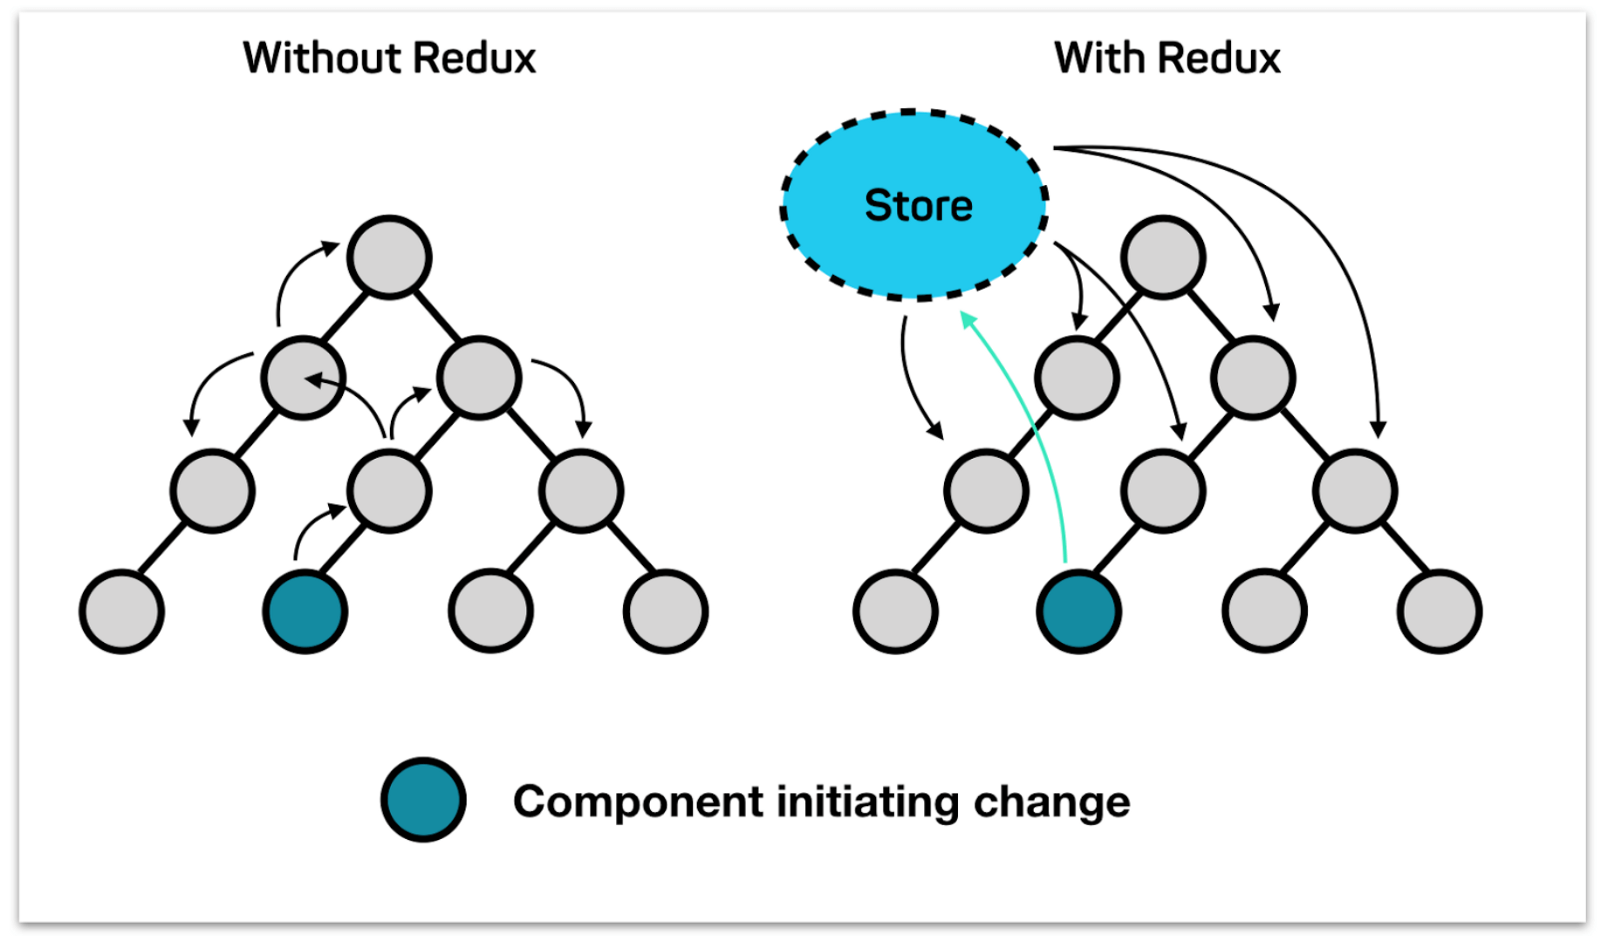
1. Global 사용은 최소화하며, Local하게 컴포넌트를 작성하자
- 리액트에서는 리덕스, Context API 등 Global State(글로벌 상태관리) 기능이 있는데, 이는 최소화하는 것을 개인적으로 권장한다. 리액트 코드 뿐만 아니라 CSS 역시 마찬가지이며, 컴포넌트간의 교류가 많으면 디버깅할 때 굉장히 어렵다. 그렇기 때문에 리액트는 다른 Frameworkd들과 달리 오직 단방향, Flux 디자인 패턴을 권장하고 있으며 컴포넌트는 최대한 Local하게 작성하는 것일 좋다고 생각한다.
 </img>
2. Conditional rendering on either condition
(두 가지 조건에서의 경우, 렌더링 조건문=조건부 삼항 연산자)
- 기존 자바스크립트에서는 if & else (return…) 문법을 사용하여 true 값과 false 값을 반환을 해주었는데, es6(모던자바스크립트)에서부터 …?…: 조건부 삼항 연산자로 대체한다
Bad example 1, before es6(나쁜 예시 2, es6 이전에는)
import React, { useState } from 'react'

export const ConditionalRenderingBad = () => {
  const [showConditionOneText, setShowConditionOneText] = useState(false)

  const handleClick = () =>
    setShowConditionOneText(showConditionOneText => !showConditionOneText)

    const beforeES6 = if (showConditionOneText) { The condition must betrue! } else { The condition must befalse! }

  return (
    <div>
      <button onClick={handleClick}>Toggle the text</button>
        <p>{beforeES6}</p>
    </div>
  )
}
Bad example 2(나쁜 예시 2)
import React, { useState } from 'react'

export const ConditionalRenderingBad = () => {
  const [showConditionOneText, setShowConditionOneText] = useState(false)

  const handleClick = () =>
    setShowConditionOneText(showConditionOneText => !showConditionOneText)

  return (
    <div>
      <button onClick={handleClick}>Toggle the text</button>
      {showConditionOneText && <p>The condition must be true!</p>}
      {!showConditionOneText && <p>The condition must be false!</p>}
    </div>
  )
}
Good example (좋은 예시)
import React, { useState } from 'react'

export const ConditionalRenderingGood = () => {
  const [showConditionOneText, setShowConditionOneText] = useState(false)

  const handleClick = () =>
    setShowConditionOneText(showConditionOneText => !showConditionOneText)

  return (
    <div>
      <button onClick={handleClick}>Toggle the text</button>
      {showConditionOneText ? (
        <p>The condition must be true!</p>
      ) : (
        <p>The condition must be false!</p>
      )}
    </div>
  )
}
3. Conditional rendering only for one condition
(한 가지 조건에서의 조건문)
- 만약 false 값을 반환하지 않고 true 값만 반환하고 싶을 때에는 위의 삼항 연산자를 쓰지말고, && 연산자를 쓴다.
Bad example (나쁜 예시 )
import React, { useState } from 'react'

export const ConditionalRenderingWhenTrueBad = () => {
  const [showConditionalText, setShowConditionalText] = useState(false)

  const handleClick = () =>
    setShowConditionalText(showConditionalText => !showConditionalText)

  return (
    <div>
      <button onClick={handleClick}>Toggle the text</button>
      {showConditionalText ? <p>The condition must be true!</p> : null}
    </div>
  )
}
Good example (좋은 예시)
import React, { useState } from 'react'

export const ConditionalRenderingWhenTrueGood = () => {
  const [showConditionalText, setShowConditionalText] = useState(false)

  const handleClick = () =>
    setShowConditionalText(showConditionalText => !showConditionalText)

  return (
    <div>
      <button onClick={handleClick}>Toggle the text</button>
      {showConditionalText && <p>The condition must be true!</p>}
    </div>
  )
}
3. Boolean props
(불리언=참,거짓 props)
- 참(true)인 값을 props 로 받고 싶다면 해당 값을 isHungry={true} 처럼 true를 굳이 써주지 않아도 된다.
Bad example (나쁜 예시 )
import React from 'react'

const HungryMessage = ({ isHungry }) => (
  <span>{isHungry ? 'I am hungry' : 'I am full'}</span>
)

export const BooleanPropBad = () => (
  <div>
    <span>
      <b>This person is hungry: </b>
    </span>
    <HungryMessage isHungry={true} />
    <br />
    <span>
      <b>This person is full: </b>
    </span>
    <HungryMessage isHungry={false} />
  </div>
)
Good example (좋은 예시)
import React, { useState } from 'react'

export const ConditionalRenderingWhenTrueGood = () => {
  const [showConditionalText, setShowConditionalText] = useState(false)

  const handleClick = () =>
    setShowConditionalText(showConditionalText => !showConditionalText)

  return (
    <div>
      <button onClick={handleClick}>Toggle the text</button>
      {showConditionalText && <p>The condition must be true!</p>}
    </div>
  )
}
2.2 property (속성)
   <label for="id">아이디</label>
   <input type="text" id="id" aria-required="true">
2.3 state (상태)
   <button aria-expanded="true">열기</button>
   <div hidden>열기 내용</div>
3. Jenkins 란
-
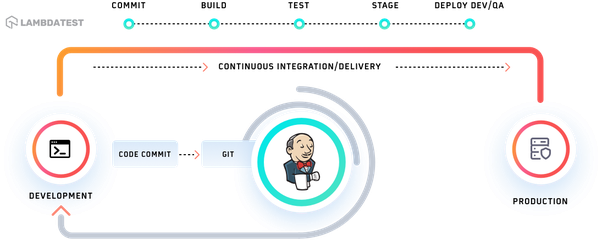
CI Tools (무료 오픈소스, 설치형) / 빌드, 테스트, 정적 분석을 자동으로 실행 해줌
 </img>
 -
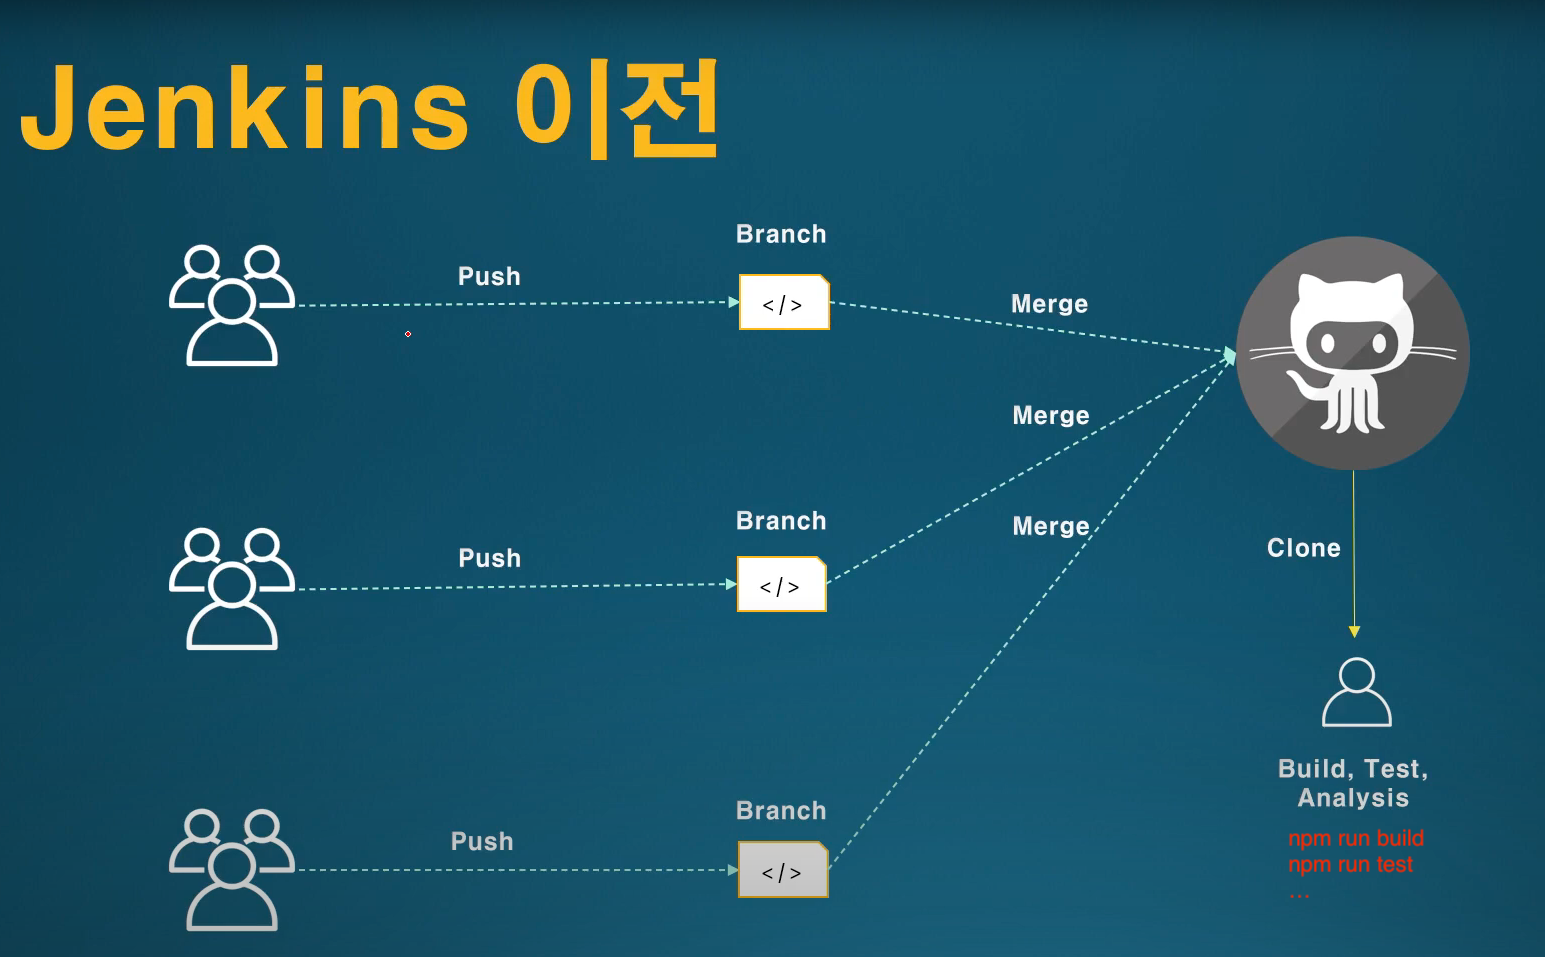
젠킨스 이전? : build, test 명령어를 수동으로 터미널에서 입력
 </img>
 -
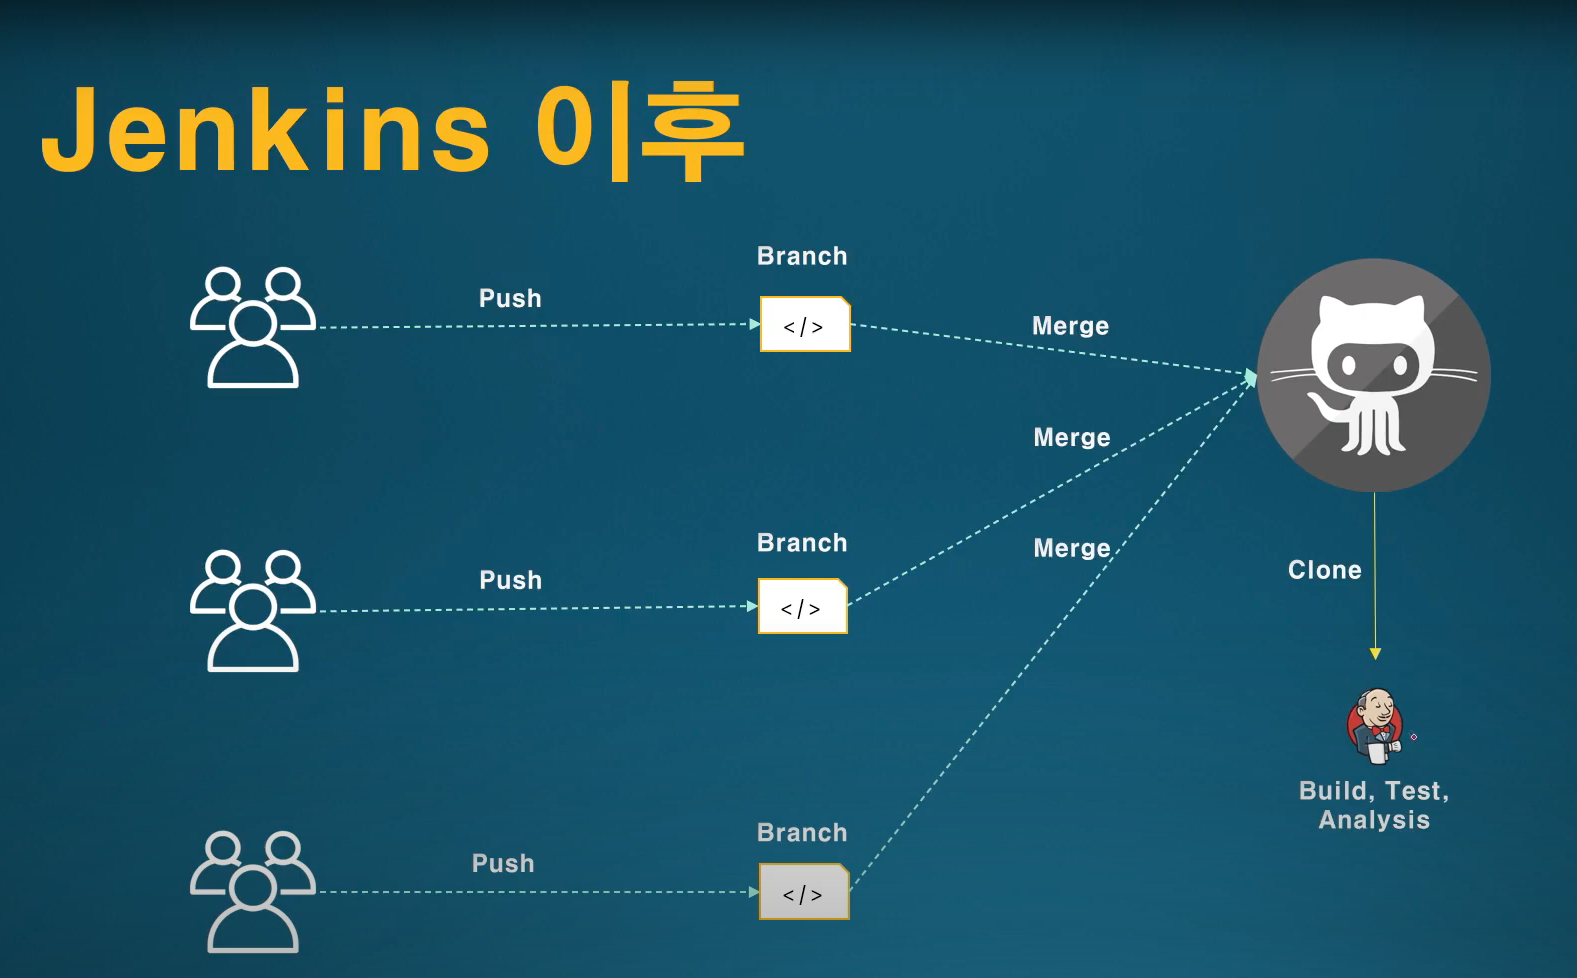
젠킨스 이후? : 일일이 build, test 명령어를 입력하지 않아도 코드만 commit 해서 push 하면 자동적으로 실행
 </img>
 -
아키텍처
 </img>
3.1 Jenkins 설치
- Jenkins 공식 홈페이지 다운로드 링크
- 공식 홈페이지에서 사용자 환경에 맞게 다운로드하여 설치
- 설치 방법은 아래의 참조 영상 빌드(Build)를 위한 Jenkins 설치 및 설정하기 참조
3.2 Jenkins Plugin
- 젠킨스의 장점 중 하나는 다양한 플러그인으로 기능을 확장 할 수 있다.
- 예를 들어 git plugin을 설치하면 git과 jenkins를 쉽게 연동할 수 있다.
3.3 Jenkins 설정
- Jenkins 접속하여 새로 생성하고 싶으면 왼쪽 메뉴에 New Item 을 클릭하여 Freestyle project(혹은 다르게도 가능)을 눌러 새 작업을 생성해준다.
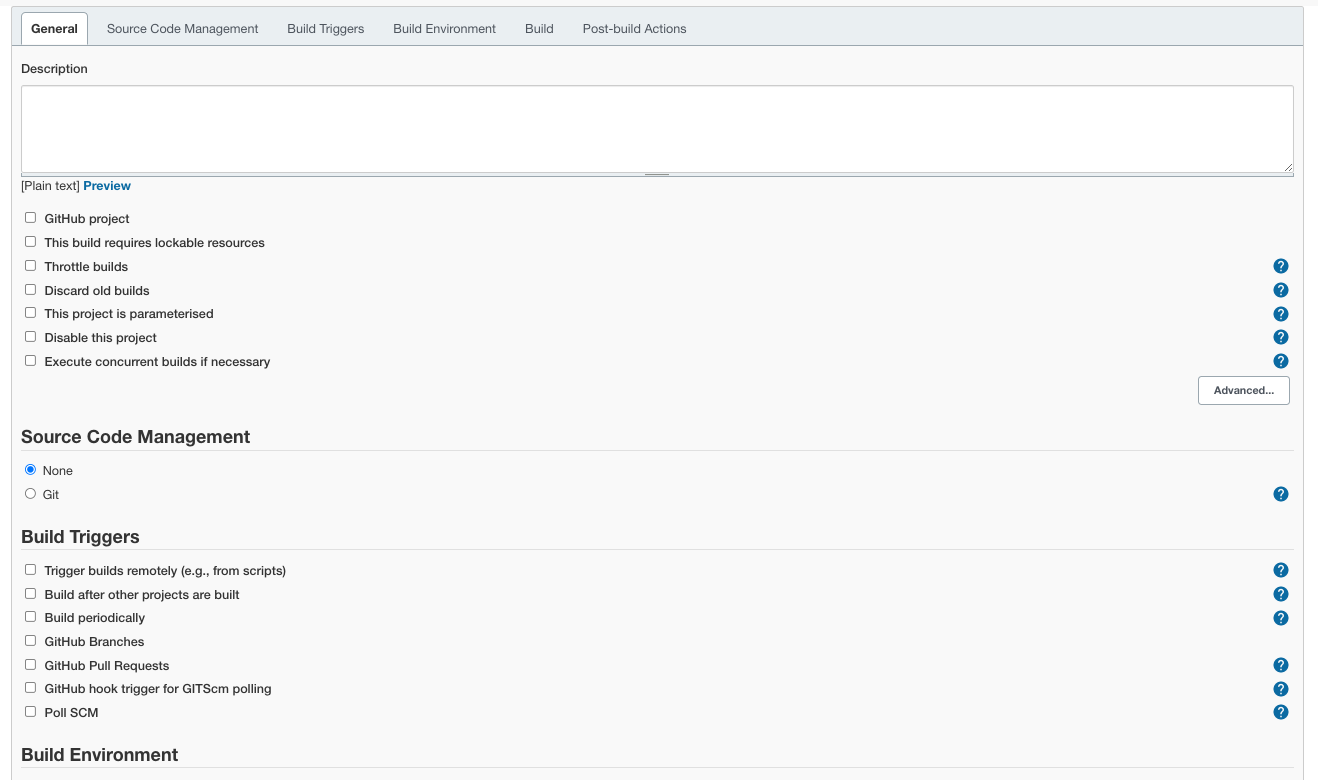 </img>
### 3.3.1 General 프로젝트에 대한 설명, url, discard old builds(오래된 빌드 삭제) 등 전반적인 설정을 한다.
### 3.3.2 Source Code Management (소스 코드 관리)
Repositories 설정 (URL, 인증)을 할 수 있으며, 어떤 Branches 들을 build 할 것인지 설정할 수 있다.
public 레포지토리는 credentials(인증) 설정할 필요가 없으나, private 레포지토리는 git 과 연동하여 설정해야한다.
### 3.3.3 Build Triggers (빌드 유발)
빌드를 언제 실행할 지를 설정할 수 있다.
- Trigger builds remotely (e.g., from scripts) 빌드를 원격으로 유발 : 외부에서 URL을 통해 빌드를 진행 할 수 있도록 설정합니다.
- Build after other project are built : 다른 프로젝트를 빌드한 후 이어서 현재 프로젝트를 빌드하는 설정.
- Build periodically** : 주기적으로 빌드
- Poll SCM** : 서버에서 변경된 사항이 존재할 때 빌드를 수행하는 설정
    ```
    schedule 예시
    15분 간격으로 빌드 작업을 수행
    H/15 * * * *
    모든 시간의 첫 30분 동안에 10분 간격으로 빌드를 수행
    H(0-29)/10 * * * *
    주말을 제외한 주중에 9시부터 16시 사이에 2시간에 한번씩 빌드를 수행
    H 9-16/2 * * 1-5
    12월 달은 제외하고 매달 1일과 15일에 한번씩 빌드를 수행
    H H 1,15 1-11 *
    ```
### 3.3.4 Build Environment (빌드 환경)
빌드 환경 설정
- Delete workspace before build start : 빌드를 실행하기 전, 이전에 사용되던 작업 공간 삭제
- Use secret text(s) or file(s) : 다양한 자격 증명에 사용할 인증 파일 또는 텍스트 사용
- Abort the build if it’s struck : 빌드가 교착 상태 등의 이유로 중지되면 지정된 시간 내로 빌드 종료 후 지정된 메시지 출력
- Add timestamps to the Console Output : 빌드 시작 시간, 빌드 종료 시간 등 시간과 관련된 내용을 Console output에 함께 출력
- With Ant : Apache Ant를 사용하여 빌드하는 환경 구성.
### 3.3.5 Build (빌드) 명령어 입력 등 다양한 방법으로 빌드 시킬 수 있다. - Execute Windows batch command: 입력된 Window command line 실행 - Execute Shell: sh -xe 명령어 실행. Linux 전용. - Invoke Ant: Ant 빌드 시스템을 사용하는 프로젝트의 경우에 사용. 입력된 인자를 통해 빌드 - Invoke Gradle script: Gradle를 빌드 시스템으로 빌드하는 프로젝트의 경우에 사용. 입력된 인자를 통해 작업. - Invoke top-level Maven targets: Maven 빌드 시스템으로 빌드하는 프로젝트의 경우에 사용. 입력된 인자를 통해 작업 - Run with timeout: 지정된 시간동안 빌드가 완료되지 않으면 빌드 중지 - Set build status to “pending” on GitHub commit: Git 프로젝트 속성에 정의된 이름 속성으로 작업 이름을 대체
3.3.6 Post-build Actions
빌드 이후 액션을 설정해줄 수 있다. (예, 이메일 알림 등)
00. 그 외
- 최대한 로컬하게 작성하라 (Component간의 데이터 이동 최소화, redux, mobx, ContextAPI, props)
- 최대한 모듈화시켜라 *****